Considering a move to WordPress.org from WordPress.com? Understanding the disparity between these platforms is crucial. This guide offers insights into the disparities and the benefits of migrating, along with a comprehensive overview of the process.
>> Read more: Guidelines for choosing an Affordable WordPress website design service in Melbourne
Difference Between WordPress.com and WordPress.org
WordPress.com and WordPress.org may sound similar, but they cater to different needs. WordPress.com offers a hosted solution with limited flexibility, while WordPress.org provides a self-hosted platform with full control over your site’s customization and functionality.

Benefits of Migrating
Migrating to WordPress.org unlocks a plethora of advantages. Enjoy complete control over your site, access to a vast array of plugins and themes, enhanced SEO capabilities, and the potential for monetization through ads and eCommerce.
Guide Overview
Our guide outlines the essential steps for migrating your site to WordPress.org seamlessly. From preparing your site for migration to transferring content and ensuring a smooth transition, we’ve got you covered every step of the way.
1. Preparation for Migration – Migrate from Wordpress.com to Wordpress.org (Step 1)
Research and Planning
Before diving into the migration process, thorough research and planning are essential. Consider the following:
Assess Your Current Website: Analyze your existing WordPress.com site to identify its structure, content, and any custom features or functionalities.
Example: Note down the number of pages, posts, media files, and plugins currently in use.
Set Clear Objectives: Determine your goals for the migration, such as gaining more control over your website, improving performance, or expanding customization options.
Example: If your goal is to monetize your site through ads or eCommerce, ensure that your new hosting provider supports such features.
Create a Checklist: Develop a comprehensive checklist of tasks to complete before, during, and after the migration process.
Example: Your checklist may include backing up your WordPress.com site, exporting content, selecting a hosting provider, and installing WordPress.org.
Domain and Hosting
Choosing the right domain name and hosting provider is crucial for the success of your WordPress.org site. Follow these steps:
Select a Domain Name: Choose a domain name that reflects your brand identity and is easy to remember and type.
Example: If your site is about travel photography, consider a domain name like “TravelSnaps.com.”
Choose a Hosting Provider: Research different hosting providers to find one that meets your needs in terms of performance, reliability, customer support, and pricing.
Example: Compare hosting providers like Bluehost, SiteGround, and HostGator to determine the best fit for your website.
Purchase a Domain Name: Once you’ve chosen a domain name, register it through your selected hosting provider or a domain registrar.
Install WordPress.org
Installing WordPress.org on your chosen hosting provider is straightforward. Follow these steps:
- Access Your Hosting Account: Log in to your hosting account dashboard provided by your hosting provider.
- Navigate to the Control Panel: Locate the control panel or dashboard section where you can manage your hosting account and website settings. Example: In the Bluehost dashboard, access the “My Sites” section to manage your WordPress installations.
- Install WordPress: Look for the option to install WordPress and follow the on-screen instructions to complete the installation process.Example: In Bluehost, click on “WordPress” under the “My Sites” section, then select “Install WordPress” and follow the prompts to set up WordPress on your domain.
By following these detailed steps and examples, you can effectively prepare for the migration of your WordPress.com site to WordPress.org, ensuring a smooth and successful transition with full control over your website’s customization and functionality.
>> Read more: Migrate WordPress Site to New Domain: Step-by-Step Guide
2. Exporting Content from WordPress.com – Migrate from Wordpress.com to Wordpress.org (Step 2)
When it comes to migrate from WordPress.com to Wordpress.org content, exporting is a crucial step. Here’s how you can seamlessly export your content:
>> Read more: Getting Started on WordPress.com – WordPress.com Support
Accessing Export Tools
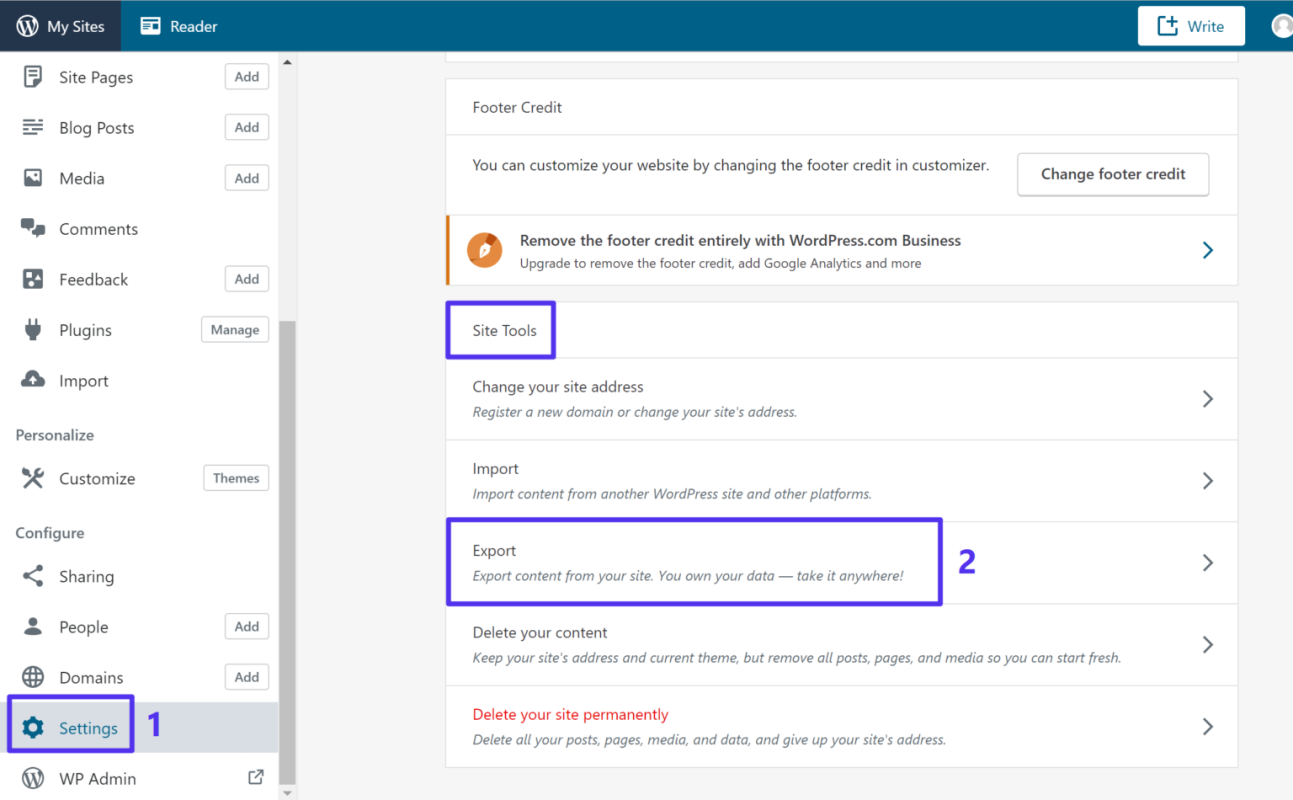
To begin the export process, navigate to the “Tools” section of your WordPress.com dashboard. Within this menu, you’ll find the “Export” option. Click on it to access the export tools.
Step-by-step instructions to navigate to Tools > Export on WordPress.com
- Log in to Your Dashboard: Start by logging in to your WordPress.com account and accessing your dashboard.
- Locate the Tools Menu: In the dashboard sidebar, locate and click on the “Tools” menu option. This will expand to reveal additional options.
- Click on Export: Within the expanded Tools menu, you’ll find the “Export” option. Click on it to proceed to the export tools.
Selecting Content to Export
Once you’ve accessed the export tools, it’s time to choose which content you want to export.
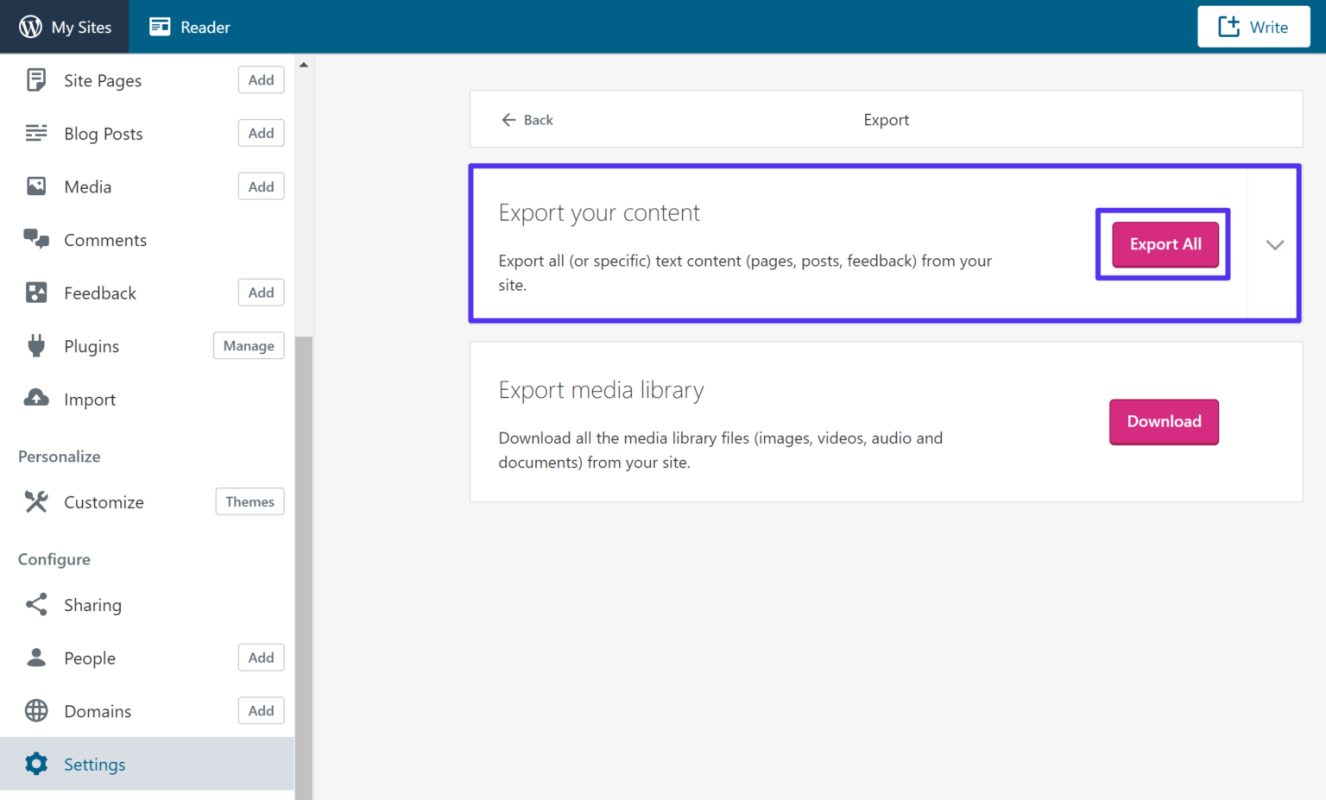
Choosing the All Content option
Within the export tools, you’ll typically find various options for exporting specific types of content, such as posts, pages, or media. However, for a comprehensive migration, it’s best to select the “All Content” option. This ensures that all your posts, pages, comments, categories, and tags are included in the export file.
Downloading the export file
After selecting the content you want to export, the next step is to generate and download the export file.
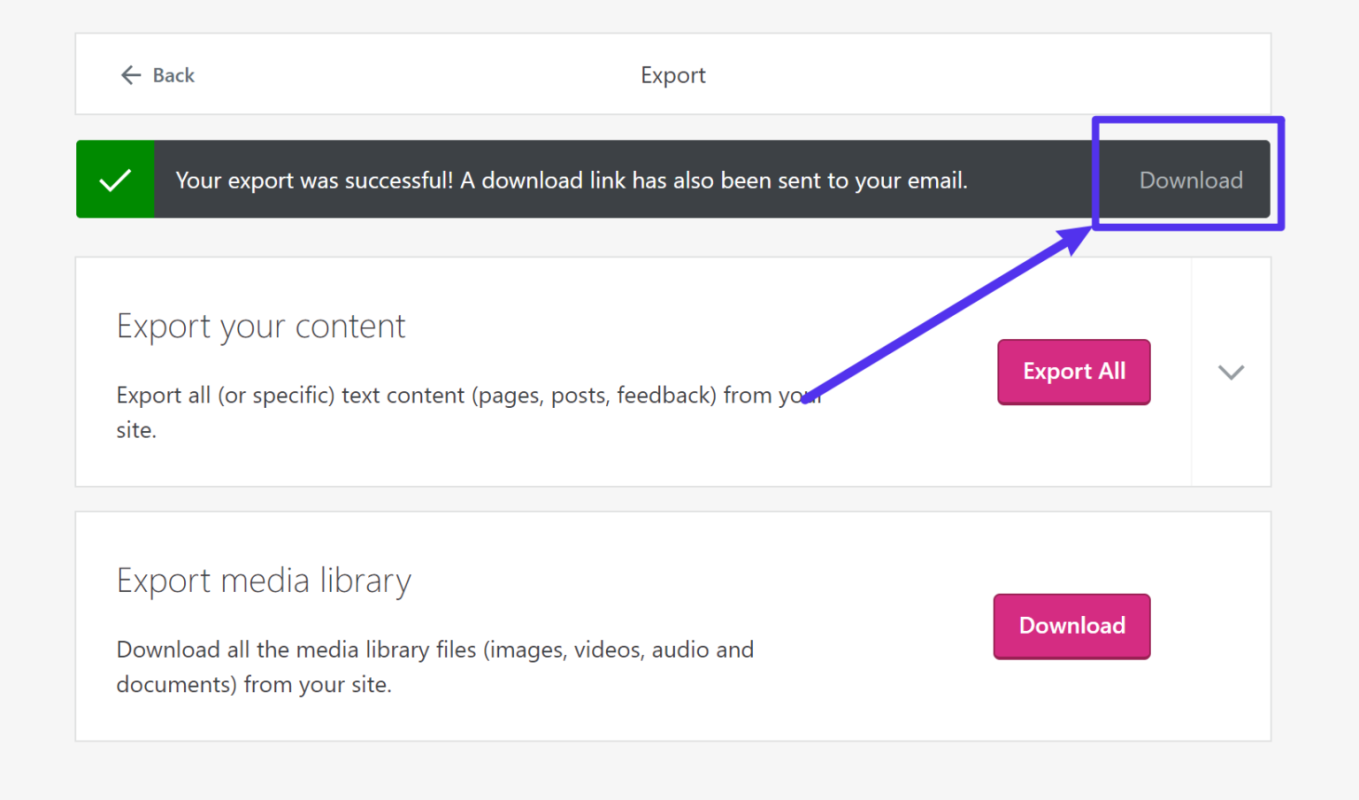
- Generate Export File: Once you’ve selected the desired content, look for the option to generate the export file. This is usually a button labeled “Download Export File” or similar.
- Save the File: Click on the “Download Export File” button to initiate the export process. Once the export file is generated, your browser will prompt you to save it to your computer. Choose a location to save the file where you can easily find it later.
By following these steps, you can efficiently export your content from WordPress.com, ensuring that you have a backup of all your posts, pages, comments, and other content before proceeding to migrate from Wordpress.com to WordPress.org.
3. Importing Content to WordPress.org – Migrate from Wordpress.com to Wordpress.org (Step 3)
Migrating your content to WordPress.org is a crucial step in the transition process. Here’s a detailed guide on how to import your content seamlessly:
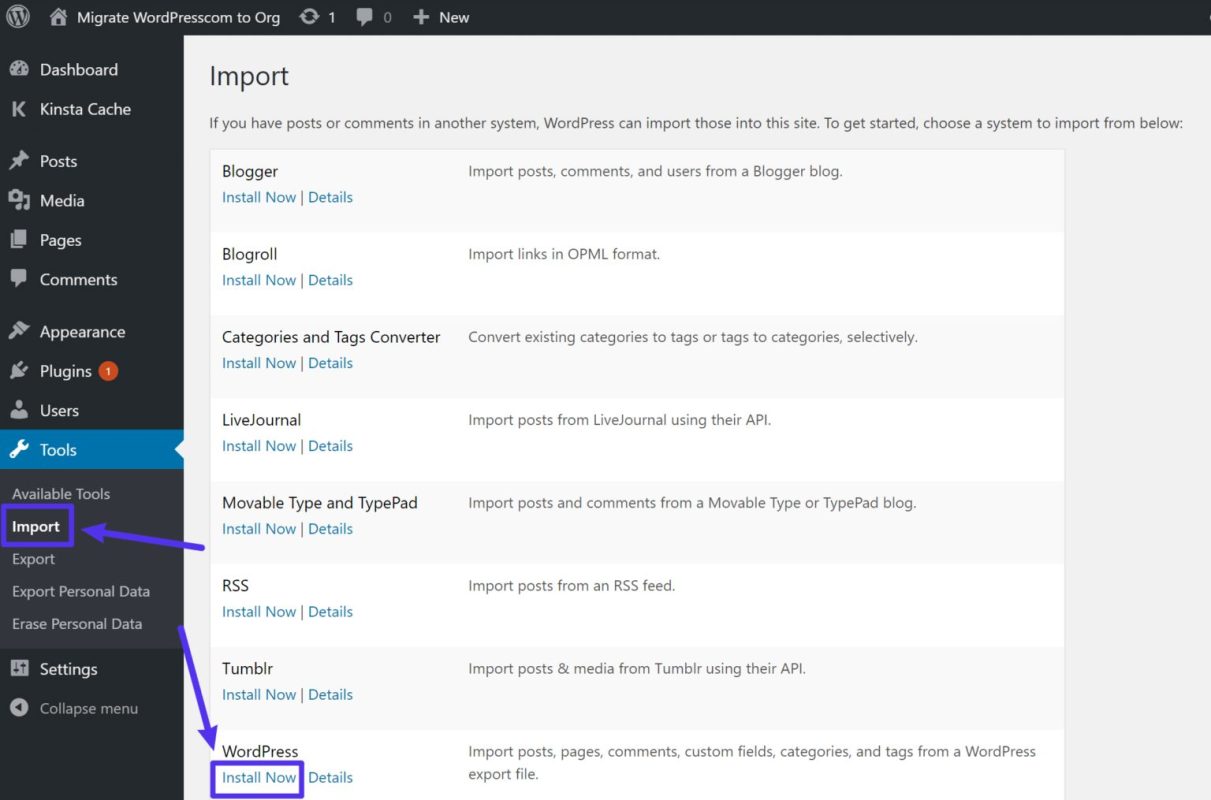
- Accessing Tools > Import on WordPress.org:
- Log in to your WordPress.org dashboard.
- Navigate to the “Tools” section in the sidebar menu.
- Click on “Import” to access the import tools.
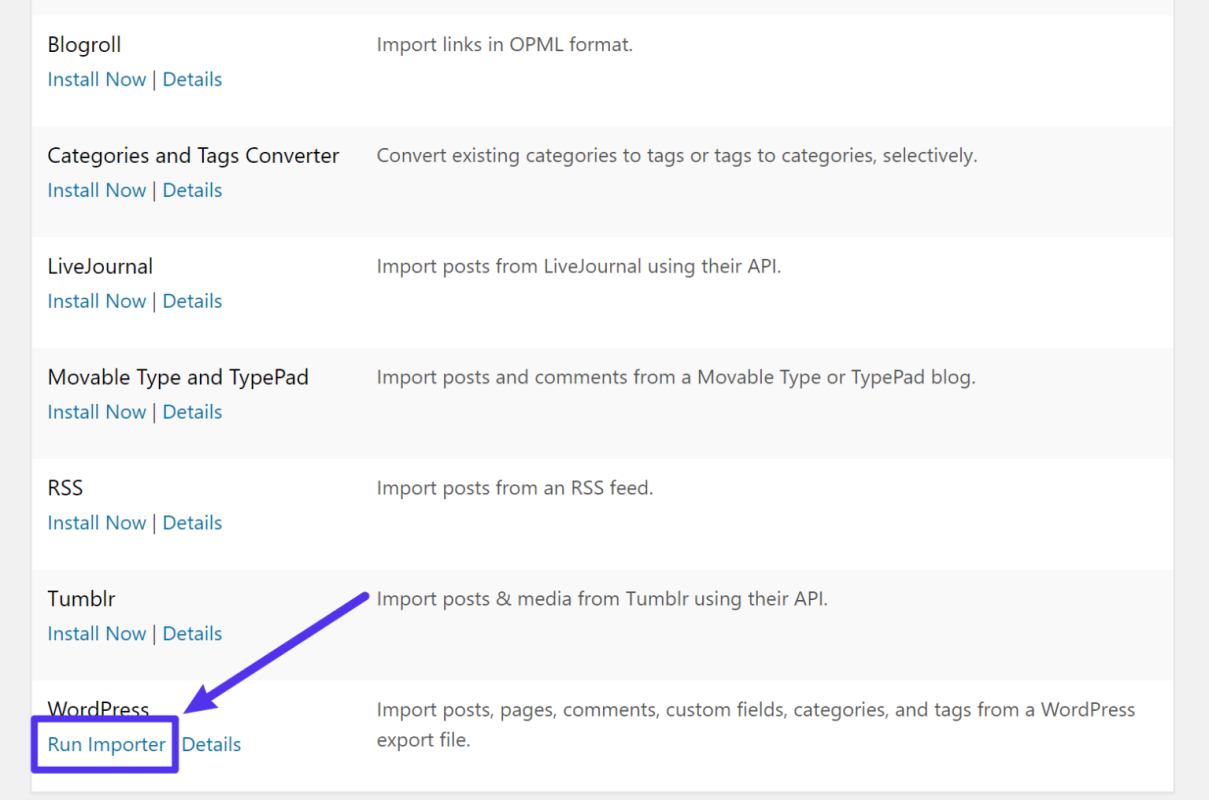
- How to Access Tools > Import on WordPress.org:
- Once in the “Import” section, you’ll see a list of available import tools.
- If the WordPress Importer plugin is not installed, locate it in the list and click on “Install Now.”
- After installation, click on “Run Importer” to proceed.
- Detailed Steps for Uploading and Importing the File:
- After initiating the WordPress Importer plugin, you’ll be prompted to upload the export file from WordPress.com.
- Click on “Choose File” to select the export file saved on your computer.
- Once selected, click on “Upload file and import” to proceed with the upload.
- Assigning Authors and Managing Attachments:
- After uploading the export file, WordPress.org will prompt you to assign authors to imported content and manage attachment settings.
- Follow the on-screen instructions to assign authors correctly.
- Manage attachment settings as per your preferences to ensure a smooth transition.
By following these steps, you can effectively import your content to WordPress.org, ensuring that all posts, pages, comments, and other elements are transferred seamlessly.
4. Configuring Permalinks – Migrate from Wordpress.com to Wordpress.org (Step 4)
Configuring permalinks properly is essential for maintaining the structure and SEO performance of your website. Here’s a comprehensive guide to help you set up permalinks in WordPress.org:
Matching Permalink Structure
Why Matching Permalink Structure Matters for SEO:
- Consistency in permalink structure ensures that existing links remain valid, preserving your website’s SEO rankings and user experience.
- It helps search engines understand the structure of your website and index your content more efficiently.
How to Adjust Permalink Settings in WordPress.org
- Accessing Permalink Settings:
- Log in to your WordPress.org dashboard.
- Navigate to “Settings” > “Permalinks” from the admin menu.
- Choosing the Right Permalink Structure:
- In the Permalinks settings, you’ll find several common permalink structures to choose from.
- Select the structure that best matches the one used on your previous WordPress.com site.
- Customizing Permalink Structure (Optional):
- If none of the predefined structures match your old permalink structure, you can create a custom structure.
- Use placeholders for post attributes like %postname%, %category%, or %post_id% to customize the permalink format.
- Saving Changes:
- After selecting or customizing your permalink structure, don’t forget to click on the “Save Changes” button to apply the new settings.
By following these steps, you can configure permalinks in WordPress.org to match your old permalink structure, ensuring consistency and preserving your SEO rankings during the migration process.
5. Redirecting Traffic and Preserving SEO – Migrate from Wordpress.com to Wordpress.org (Step 5)
Ensuring seamless traffic redirection and maintaining SEO rankings are vital aspects of migrating to WordPress.org. Here’s a detailed guide to help you with this critical phase:
Setting Up Redirects
- Using WordPress.com’s Site Redirect Service:
- WordPress.com offers a convenient Site Redirect service, which automatically redirects your old URLs to the corresponding pages on your new WordPress.org site.
- Access this service through your WordPress.com dashboard and follow the prompts to set up redirects effortlessly.
- Alternative Methods for Setting Up 301 Redirects:
- If you prefer alternative methods or don’t have access to WordPress.com’s Site Redirect service, you can set up 301 redirects manually.
- This involves configuring redirection rules on your old site’s server or using plugins like Redirection or Yoast SEO to manage redirects within WordPress.org.
Maintaining SEO Rankings
Tips to Ensure Search Engines Recognize the New Site Location:
- Submit an updated XML sitemap to search engines, informing them of your site’s new structure and URLs.
- Use the Change of Address tool in Google Search Console to notify Google about your site migration.
- Update any internal links on your website to point to the new URLs.
- Monitor crawl errors and fix any broken links or redirection issues promptly.
By implementing these strategies, you can redirect traffic smoothly from your old WordPress.com site to your new WordPress.org site while preserving your SEO rankings and ensuring uninterrupted visibility on search engines.
6. Migrating Subscribers – Migrate from Wordpress.com to Wordpress.org (Step 6)
Transferring your subscribers is vital for maintaining audience engagement during your migration to WordPress.org. Here’s a concise guide on how to use Jetpack for subscriber migration:
Using Jetpack for Subscriber Migration
- Steps to Install Jetpack on WordPress.org:
- Log in to your WordPress.org dashboard.
- Navigate to “Plugins” > “Add New” from the admin menu.
- Search for “Jetpack” and click on “Install Now” next to the Jetpack plugin.
- After installation, activate the plugin.
- Connecting Jetpack to WordPress.com to Transfer Subscribers:
- In your WordPress.org dashboard, go to “Jetpack” > “Settings.”
- Click on “Connect to WordPress.com” and follow the prompts to connect your WordPress.org site to your WordPress.com account.
- Initiating Subscriber Migration:
- Once Jetpack is connected to WordPress.com, navigate to “Jetpack” > “Settings” > “Engagement.”
- Scroll down to the “Subscriptions” section and click on “Settings.”
- Follow the instructions to migrate from WordPress.com to WordPress.org.
7. Post-Migration Tasks – Migrate from Wordpress.com to Wordpress.org (Step 7)
Once you’ve completed to migrate from Wordpress.com to WordPress.org, there are several important tasks to attend to ensure your new site is fully optimized and functional:
Customizing Your New Site
- Selecting and Installing Themes:
- Explore WordPress.org’s extensive collection of themes.
- Choose a theme that aligns with your brand identity and website goals.
- Install and customize the selected theme to match your preferences.
- Adding Necessary Plugins for Enhanced Functionality:
- Identify essential plugins to improve your site’s functionality.
- Install and activate plugins for features like SEO optimization, contact forms, security, and performance optimization.
Testing Your Site
- Checklist for Ensuring All Content, Links, and Features Are Working:
- Conduct a thorough review of your site to ensure all content, links, and features are functioning correctly.
- Test navigation, forms, media display, and any custom functionalities.
- Updating External Links and Informing Audience:
- Update social media profiles, email signatures, and other external platforms with your new site URL.
- Communicate the change to your audience through email newsletters, social media posts, and website announcements.
8. Troubleshooting Common Issues – Migrate from Wordpress.com to Wordpress.org (Step 8)
During the migration process, you may encounter some common issues. Here’s how to address them:
Handling Import Errors
- Common Issues Faced During Content Import and Their Solutions:
- If you encounter import errors, check for incompatible file formats or server limitations.
- Break down the import process into smaller batches to troubleshoot specific issues.
- Dealing with Missing Media:
- Ensure all media files are properly transferred by re-uploading missing files.
- Update media file paths in imported content to reflect the new site’s structure.
By completing these post-migration tasks and addressing common issues, you can ensure a smooth transition to migrate from Wordpress.com to WordPress.org and optimize your site for success.
Discover more articles on Stream-hub’s blog or explore Stream-hub’s services for expert assistance.

